|
April 8, 2019 AsktheBuilder Newsletter
Are you a new subscriber? Hello from snowy Bar Harbor, Maine where I'm working on my daughter's home. Subscriber of record in good standing? There's 4 inches of FRESH SNOW on the ground and more falling! The winter with no end! READ THE NOTICE JUST BELOW PHOTO OF MY BOOT A Day OffToday I'm taking the day off. My son-in-law and I worked the past eleven days straight here on his new home and that of my daughter. Each day was ten hours and yesterday we finally decided to work a half day so we could enjoy the gorgeous sunny day with a 52 F temperature. I drove just 20 minutes to get to Acadia National Park's ocean walk. I then parked my truck, walked about a mile, and took a nap on the granite ledge above the sea. Here was the view when I woke up. I fell asleep for at least 30 minutes and was happy no sea gulls were pecking at my face. You're About to Receive Weird Messages From Me - Don't FREAK OUTIn a few moments, I'm going to add about four or five new messages to my Welcome-to-my-Family email series. These messages are designed to help NEW SUBSCRIBERS become more acquainted with all the content and services at AsktheBuilder.com.
I can't stop these messages coming to you. You may actually discover something new, so don't freak out. If you're currently stressed out, just ignore them. You'll know the messages are somewhat different because in the subject line you may see something like (2 of 5) or (3 of 5) or (4 of 5) etc. There's NO NEED TO RESPOND to me about these weird messages. Consider opening up the messages - they're short - and maybe you'll save some money. New Columns and VideosI uploaded several new videos today and a new column. It's important to realize, you can always find the FRESHEST AsktheBuilder.com content by going to the Q&A navigation link at any page of the website. The topics you see at the top of the stack are the latest ones added to the website. CLICK or TAP HERE and scroll down a bit to see a headline that's of interest to you. The top headline about the Install Radiant Heat Under a Wood Floor is an amazing video you should watch! (Editor's Note: At the time of this Newsletter being posted, the Install Radiant Heat Under a Wood Floor Column was pushed down to second on the page, since the Newsletter took over top spot.) I'll have a full-blown newsletter to you soon after I re-charge my mental and physical batteries. Tomorrow we start to install all the electrical wiring in Meghan and Brent's home. Yes, it's all 12 gauge. I deplore 14-gauge wire. The 12-gauge wire, when I bought it a few months ago, was only ten cents more per foot. What a bargain to have a 20-amp circuit! Tim Carter Do It Right, Not Over! The post April 8, 2019 AsktheBuilder Newsletter appeared first on Ask the Builder. Via Home http://www.rssmix.com/via Blogger http://theastrinaraymundo.blogspot.com/2019/04/april-8-2019-askthebuilder-newsletter.html April 10, 2019 at 12:08AM
0 Comments
Install Radiant Heat Under Wood Floor 24 Inches OC
Installing Radiant Heat TubingTim Carter shows the complex method of looping Uponor hePEX tubing in between framing that's 24 inches on center. Three heat transfer plates are in each truss bay, not two. The post Install Radiant Heat Under Wood Floor 24 Inches OC appeared first on Ask the Builder. Via Home http://www.rssmix.com/via Blogger http://theastrinaraymundo.blogspot.com/2019/04/install-radiant-heat-under-wood-floor.html April 10, 2019 at 12:08AM
XO Rust Spray Paint Video
XO Rust Spray Paint VideoWatch this video to see how I used XO Rust spray paint to restore a rusted piece of wrought-iron patio furniture. The test panels will be just after the music interlude. The post XO Rust Spray Paint Video appeared first on Ask the Builder. Via Home http://www.rssmix.com/via Blogger http://theastrinaraymundo.blogspot.com/2019/04/xo-rust-spray-paint-video.html April 10, 2019 at 12:08AM
Mystical Mt. Desert Island Artesian Well Water
Tim Carter discovers a mystical artesian well on Mt. Desert Island. Consuming this elixir makes one feel like they're 18 years old again. Watch the results for Tim. The post Mystical Mt. Desert Island Artesian Well Water appeared first on Ask the Builder. Via Home http://www.rssmix.com/via Blogger http://theastrinaraymundo.blogspot.com/2019/04/mystical-mt-desert-island-artesian-well.html April 10, 2019 at 12:08AM
Sticky House Wrap and Squirrels in Attics
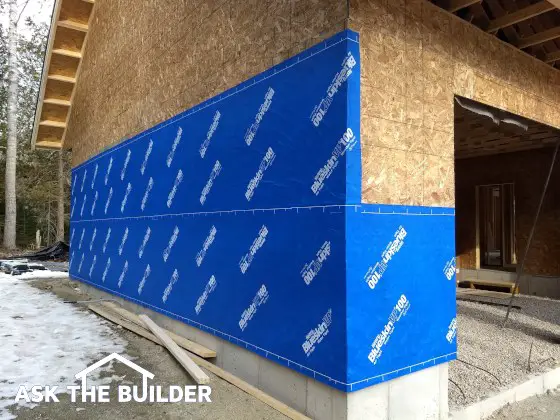
This is a marvelous newer full-adhesion house wrap. Installed correctly, you’ll discover your heating and cooling bills will be much lower. (C) Copyright 2019 Tim Carter Sticky House WrapQUESTION #1: Tim, I’m building a new home and the builder wants to apply an exterior house wrap that reminds me of adhesive shelf paper. All the other house wraps I’ve seen come in large rolls and are nailed to the house. I’m afraid the adhesive house wrap might not stand the test of time. How do you feel about these self-adhering house wraps and what’s involved in getting it installed correctly? Pam T., Lexington, KY You may be building a new home like Pam or having a room addition put onto your home. Self-adhering house wraps are a great refinement over the first-generation house wraps that require nails. I would absolutely use a self-adhering house wrap on a new house I’d build for myself, a family member, or a customer. There are several manufacturers of the self-adhering house wraps. All the products are fabulous and it’s quite hard to differentiate them from one another. As with many things in construction, the devil is in the details. You can have a great product and it can be installed incorrectly thus voiding the warranty and causing nightmares down the road for the homeowner. I witnessed a builder this past winter who did just that. He decided to use a traditional nail-on house wrap but used a hand tacker tool that pounds hundreds of small staples through the house wrap into the wood wall sheathing. The issue is the staples are an unapproved fastener and they actually create tiny holes around each staple that can leak both water and air. The newer self-adhered house wraps won’t allow liquid water to touch the wood framing, but they allow water vapor in the wall assembly to pass through to the atmosphere. This is exactly what you want. I’m attracted to the newer house wraps that have the adhesive because they do a superb job of bridging any gaps in the wall sheathing and virtually eliminate air infiltration into a house. Air infiltration is a major cause of higher fuel bills for both heating and air conditioning. It’s very important for you, the homeowner, to read the simple installation instructions for the self-adhering house wrap you decide to use. The instructions are simple and not at all complex. Some products can be installed horizontally or vertically. I’d recommend a horizontal installation starting at the bottom of the structure. Be sure you overlap the next higher piece no less than 2 inches or whatever the instructions say to do. Most products have great instructions how to deal with pipe and duct penetrations on the outside walls. You also need to follow the instructions with respect to how to apply the overlapping pieces of the house wrap around all windows and doors. Some of the products require the use of a j-roller that works just like a giant steamroller that compresses asphalt paving on roads and driveways. The j-roller ensures the house wrap adhesive is in great contact with the wood wall sheathing. Pay very close attention in the written instructions or videos about how to flash underneath all windows and doors. You need to inspect these openings to ensure it’s been done correctly. If you can’t be there, then insist the builder take photos with his smart phone of every window and door and send them to you so you can verify the job was done correctly. Squirrels In AtticsQUESTION #2: Last night I came face-to-face with a squirrel up in my attic. I was astonished at his presence and wondered how he gained entrance. I looked at my roof and saw my ridge vent was higher in one spot. I had the ridge vent put in when I re-roofed the house thinking it would be a benefit to the traditional triangle gable-end vents that have worked well for 50 years. What’s the best way to stop the squirrel from becoming a permanent resident in my attic? I’m open to any and all suggestions. Chris A., Arab, AL Animals of all sorts try to get into house attics. A few years ago, I had at my own home an infestation of flying squirrels in my attic. At night the little devils would roll acorns across my bedroom ceiling like they were bowling. It was infuriating. I solved my problem when I re-roofed my home by sealing off the entrances with heavy metal. My advice to Chris, or you should you have the same issue, is to get rid of the ridge vent. I’d get a 10-inch-wide piece of heavy aluminum coil stock that siding contractors use. This would cover over the cut-out made for the ridge vent. Nail it securely over the shingles at the peak of the roof every 6 inches. I’d then cover over the aluminum with standard asphalt cap shingles to match the current roofing. Since cap shingles are 12 inches wide, they’ll fully cover the aluminum so you’ll never see it. The squirrels will have to chew through the shingles only to encounter the thick aluminum. I’m quite sure they’ll give up and go to your neighbor’s home where it’s easier to get into the attic. I happen to love turbine vents. I’d consider adding two or three on the back of your home up near the peak of the roof. Be sure you can’t see the spinning whirlybirds from the front yard or the street. Squirrels don’t like the spinning motion of these great wind-powered ventilators and you should have no issues at all in the future. Column 1296
The post Sticky House Wrap and Squirrels in Attics appeared first on Ask the Builder. Via Home http://www.rssmix.com/via Blogger http://theastrinaraymundo.blogspot.com/2019/04/sticky-house-wrap-and-squirrels-in.html April 10, 2019 at 12:08AM
Bicycle Camper Trailer with Oversize Tent Cot
Innovative self contained cycling trailer with 120 liters of storage makes a multiple day trip a breeze via Blogger http://theastrinaraymundo.blogspot.com/2019/04/bicycle-camper-trailer-with-oversize.html April 09, 2019 at 10:08AM
Inspired Through Instagram: Dining Room Dreams
Most homes have a designated space for dining and it’s so fun to dream about the possibilities of creating a welcoming space for you and yours. Dining rooms can have many design elements. You may prefer modern or farmhouse or maybe some touches of color. We’ve tried to find a little something for everyone in […] The post Inspired Through Instagram: Dining Room Dreams appeared first on Remodelaholic. via Blogger http://theastrinaraymundo.blogspot.com/2019/04/inspired-through-instagram-dining-room.html April 09, 2019 at 04:09AM
Remodelaholic Month in Review: March 2019
We hope that you had a terrific month and have a lot to look forward to coming up! Spring is officially here and we are taking in all the warm weather possible! We even made tinfoil dinners tonight for dinner on the grill. What fun activities are you ready to get back into? Did you […] The post Remodelaholic Month in Review: March 2019 appeared first on Remodelaholic. via Blogger http://theastrinaraymundo.blogspot.com/2019/04/remodelaholic-month-in-review-march-2019.html April 08, 2019 at 04:08PM
Friday Favorites: Budget Bathroom Makeovers and more
 Hello, hello! Friday again already? I’ve been waiting for it all week. And this week we are all about bathroom makeovers. Small and large! Sometimes something simple can completely change the look of your bathroom, and sometimes you want to change the whole room. We’ve got tips for all over the bathroom. Favorite Storage Makeover: […] The post Friday Favorites: Budget Bathroom Makeovers and more appeared first on Remodelaholic. via Blogger http://theastrinaraymundo.blogspot.com/2019/04/friday-favorites-budget-bathroom.html April 06, 2019 at 07:59AM
March 31, 2019 AsktheBuilder Newsletter
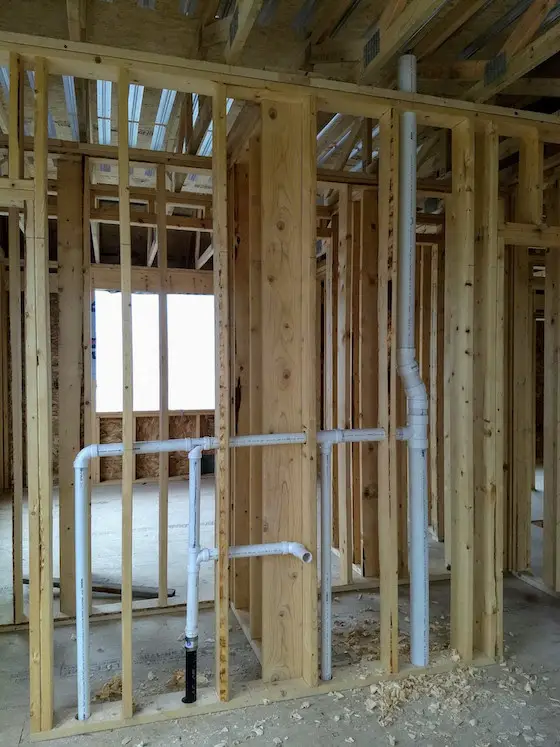
Are you a new subscriber in the last week? Welcome and you picked a great time to jump aboard. Distinguished subscriber of record? I've got some great new-house eye candy for you today. Floor Trusses - Endless JoyThe construction of my daughter and son-in-law's house continues. The brutal cold weather is behind and I've been hard at work with my son-in-law continuing to put in the entire plumbing, radiant heat, and electrical systems in the house. Before I jump into the topic of floor trusses, I wanted to give you an overview of what's going on. The past few days, I pretty much finished all the rough plumbing drain, waste, and vent piping. Here's a couple of shots showing how to combine the benefits of cast iron with the affordability of PVC. This first photo was taken in the living room looking above at the underside of the master bathroom. You see lots of no-hub cast iron piping installed for both durability and sound control. You'll never hear water flowing across the ceiling and down a wall after someone flushes the toilet or takes a shower! Cast iron is QUIET!
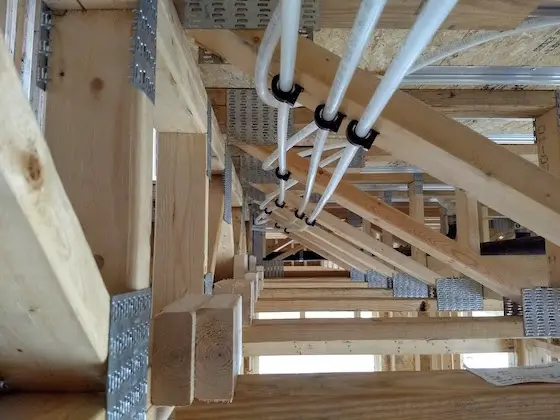
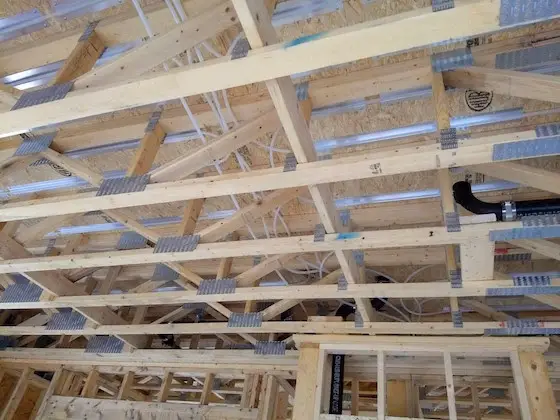
The other white PVC pipes are vents (left to right) for the shower, free-standing tub, and the not-so-common 3-inch full-size vent for the toilet and the rest of the house. That 3-inch pipe will be extended across the ceiling this coming week and connect to the 4-inch pipe that pokes through the roof. Note how the vanity stack has cast iron extending up through the floor, but at the tee fitting it has transitioned to plastic PVC. You can combine the two pipe types in your home just like this. CLICK HERE to see why you'd want to use both cast iron and PVC pipes in your next new home or remodeling job. I've used floor trusses on a past job or two. It's been so long I forgot how wonderful they are. Each day as we've been working putting in over 5,000 linear feet of the Uponor WIRSBO hePEX tubing for the radiant heating, I've come to fall in love with floor trusses. They have me swooning. Look at the following photos and tell me if you could ever imagine putting in all you see using regular solid floor joists. Think of how many holes and friction points you'd have with solid lumber! CLICK or TAP HERE to read about floor trusses. In that column, you'll discover a link you can click to get pricing for floor trusses and a local factory that will make them for you. I recorded a FAST video about nine days ago on a whim about floor trusses. It was raining outside, it was dark in the garage and we used an iPhone. That explains why the video is not as good as my normal ones. But I was SO overjoyed while working up in the floor trusses I had to share what I felt. CLICK or TAP HERE to watch the fast video. I can't begin to tell you how difficult it would be to run all the hePEX without the floor trusses. Without floor trusses, I can't begin to tell you how many hundreds of holes would have to be drilled for all the:
I can't begin to tell you how much my shoulder would ache. I can't believe all the extra time it would have taken. Oh, and it's important to realize, when you decide to use floor trusses, you eliminate the need for interior bearing walls! Can you see how that gives you all sorts of options when it comes to open floor plans and the ability to change the floor plan in the future with minimal disruption? The other thing I love about the floor trusses is all the floors in the house are FLAT. Regular floor joists have crowns in them and the resulting floor can have all sorts of humps and dips in it. Floor trusses allow you to have nice smooth floors. I'm shooting a very interesting video today about how to install hePEX tubing that's 8-inches on center in 24-inch-on-center framing. You can have that in certain situations. I was unable to locate a video on YouTube showing how to do this very complex operation. It's not going to be easy to record the video, because it's such a hard thing to visualize and do. But I'm going to give it my best shot. It's time to get ready to go to the job site. I've already worked the past three days ten hours a day and the next eight are more of the same as my son-in-law took off a week of vacation so we could ram-rod this part of the job. Have a great week! Tim Carter P.S. NEXT WEEK is a full issue about our certified organic Stain Solver. Now that spring has arrived, you need to know all about Stain Solver and ALL of the things it can clean around and in your home. Of course there will be a special sale - especially on our most popular 4.5 and 9.2-pound sizes.
I'm going to be sharing many of the things you can CLEAN safely using Stain Solver. You'll also hear some incredible stories from homeowners just like you. Here's my FAVORITE story of all time with stunning before and after photos. Look VERY CLOSELY at what's under the hat in the top BEFORE photo. Do It Right, Not Over! The post March 31, 2019 AsktheBuilder Newsletter appeared first on Ask the Builder. Via Home http://www.rssmix.com/via Blogger http://theastrinaraymundo.blogspot.com/2019/04/march-31-2019-askthebuilder-newsletter.html April 03, 2019 at 10:23PM |


 RSS Feed
